Weekend Brunch – Savoury Bread Nests

Savoury Nests 10
My sister used to make these Savoury Nests when we were little and I still make them now for an easy weekend lunch or after school snack. They are really tasty and you can add almost anything you like to them. Also an easy recipe to start kids off baking with you in the kitchen.

They are sort of mini egg pies or quiches I guess – light and fluffy with a lovely crunchy bread base, they can be as simple as egg, cheese & ham or you can add tomatoes, herbs, cream cheese, feta, capsicum, bacon, diced onion etc, anything you might like to add for flavours.

This is the basic recipe, feel free to experiment with adding other ingredients from your cupboard to jazz them up!

Ingredients

8 slices bread (sandwich or toast slice)
Butter or Margarine
5 eggs
2 TBSP Milk
Grated Cheese
Diced Ham
Salt & Pepper to Taste
(Optional anything else you might like! see above)

Savoury Nests 1

Method

Preheat Oven to 200C.

Remove the crusts from the bread.

Savoury Nests 2

Spread softened butter or margarine over the entire slice.

savoury Nests 3

Gently press the slices buttered side down into a muffin tray and firmly shape the bread against the muffin tin to form a nest for the ingredients.

savoury Nests 4

Add a small amount of cheese and ham to the bread cases and set muffin tray aside. (If you are using tomato, capsicum, feta etc now is the time you would add those)

Savoury Nests 5 savoury Nests 6

In a small bowl, add your eggs and milk and whisk until well combined. Season with salt & pepper and again whisk well (you may wish to add other herbs or spices you like combined with egg).

Savoury Nests 7

Carefully pour the egg mixture into the cases, ensuring it does not overflow the sides of the cases. Once all poured in you may wish to top up some cases if the egg absorbs into the bread. Top off with a final amount of cheese on each one, a small dusting of mixed herbs is also nice.

Savoury Nests 8

Bake for approx. 20 minutes or until the egg mixture has risen and is a golden brown colour.

Savoury Nests 11

Allow to cool for a few minutes in the tin, then using a knife carefully scoop out the nests onto a board or a cooling rack, you may need to loosen the cases with the knife in some places.

Savoury Nests 10

Serve warm with a salad or on their own for a tasty cheesy eggy bready treat. If you need to make these ahead of time, simply pop back in the oven for 5-10 minutes to warm through.

I hope you have enjoyed this old recipe today, if you wish to receive my recipes as I post them you can either register your email above left, or follow me on Facebook or Twitter, I post something new a few times a week.

http://www.facebook.com/justamumnz
http://www.twitter.com/justamumnz

Thanks for stopping by – be sure to share this with your friends and let me know if you make it and how you get on 🙂

Easy Perfect Roast Potatoes

Roasted Potatoes 5
I thought I would share my method of roasting potatoes – results in a yummy crunchy outside and soft fluffy inside in no time at all. You can also do Kumera or Sweet Potato this way and it takes even less time.

I have not included quantities as it depends if you need 2 or 10 potatoes or have a small or large roasting dish!

Ingredients

Agria or other suitable Roasting Potato
Flour
Oil
Butter
Salt
(Optional) Cumin Seeds or Rosemary

Method

Pre heat the oven to 220C, peel potatoes and cut to desired size (I usually make them approx. 2 inches round) usually in half or thirds for a medium to large potato.

In a large pot cover potatoes with water and set to boil – once boiling leave for approx. 8-10 minutes or until the potato just starts to cook – you can usually see that the outside layer of the potato changes colour from the rest and this is the time to take it off the heat.

Roasted Potatoes 1

Drain potatoes – you can return to the pot if you wish and some people try and rough up the potato a bit but I do not usually bother.

Add a few Tablespoons of flour to the pot and put the lid back on the potatoes and holding lid firmly shake pot to cover potatoes fully in flour. This is also the time to add the cumin seeds with the flour if you like – adds a lovely flavour, 1 tsp is plenty.

Roasted Potatoes 2

Set potatoes aside while you add oil to the roasting dish – just enough so that once melted it will cover the entire base of the dish and heat this in the oven for a few minutes until hot. Remove from the oven and add a few knobs of butter and pop back into the oven for only a minute, just until butter melted but not brown.

Then add the potatoes – using tongs as they are hot!

Roasted Potatoes 3

Put roasting dish in the oven for 10 minutes, then turn potatoes, cook for a further 10 minutes, turn again if desired and cook again for up to 10 minutes – checking occasionally. Remove from oven once desired colour is achieved, a lovely golden brown, on all sides of the potato. Lightly dust with salt and serve!

Roasted Potatoes 4

You can if needed add a little more butter during cooking process if you think the pan dry or the potatoes have absorbed the liquid – but not too much otherwise they will be soggy and not crispy once done.

This goes lovely with my amazing Roast Leg of Lamb that I will one day share with you all!

Thanks for stopping by, you can follow my blog via email above left, or find me on Facebook or Twitter to receive my recipes as I post them.

http://www.facebook.com/justamumnz
http://www.twitter.com/justamumnz

Have a great day!

🙂

Wraps & Quesadillas – A Kid Approved Meal!

Quesadillas
This is one of the most popular lunch items on our family menu! Using the same ingredients I can manage to keep the whole family happy with a lovely simple, healthy meal!

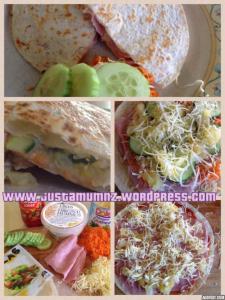
It can either be a yummy lunch option or an easy dinner and for us it suits everyone, from the vege loving daughter who likes her tortillas to be fresh wraps full of hummus, salad & ham, to our meat & cheese loving son who wants his as warm Quesadillas. In our family of five it is hard to find meals that everyone likes but this one is a winner – same ingredients, different outcomes – happy family!

Ingredients – The main ingredient is Tortillas, and after that you can include anything you like! Can be as simple as ham, pineapple & cheese, to gorgeous chutneys, specialised cheeses & meats with plenty of fresh seasonal veges.

Wraps 2

You can simply use the tortillas as fresh wraps or cook in a frying pan to create tasty quick quesadillas. Salad isn’t optional – so it either goes in the wrap or on the side but we make it what the kids like so if it is just a carrot cucumber salad I think that is better than no salad at all!

Wraps 1

I hope you enjoy this quick Just a Mum meal idea, from my family to yours.

You can find me on Facebook for other recipes, fun kids activities and random Mummy Musings.

😀

Super Quick & Easy Cheese Puffs

Cheese Puffs 5

This recipe is so quick and simple with every day ingredients that it is a perfect snack to whip up in no time at all. Great for an after school snack, to take a plate for nibbles or when visitors pop in. It can easily be jazzed up by serving with pesto, or cream cheese & salmon or any way you desire! I serve mine with either butter or garlic butter for easy snack – Divine fresh from the oven but tasty cold as well.

If you feel like something savoury this literally takes no more than 20 minutes start to finish!

Ingredients

1 egg
1/2 cup Milk
1 Cup Flour
2 tsp baking powder
1 pinch salt
2 Cups Grated Cheese – I used tasty but any strong hard cheese is fine – Try 1/2 a cup of Parmesan!
Optional: pinch of paprika or curry powder or any other herbs or spices you enjoy.

Cheese Puffs 1

Method

Whisk together egg & milk in a medium sized bowl. Add to that the flour, baking powder, salt & cheese (I also added a pinch of curry powder). Mix well until just combined.

Prepare a baking tray with non stick oil spray and dollop tablespoons of the mixture evenly spaced onto the tray.

Bake in a hot oven 200C (400F) for 10 minutes or until just golden brown and sounds hollow to tap.

Cheese Puffs 2Cheese Puffs 3Cheese Puffs 4

Remove from oven and enjoy! This recipe made 12 Cheese Puffs, you can easily double or triple this recipe and make the puffs any size you like!

Cheese Puffs 6

Please check me out on Facebook at http://www.facebook.com/justamumnz for updates on more of my recipes and fun kids activities.

Share with your friends and kindly ask them to LIKE me too! 😀

The Best Macaroni Cheese – With a Twist

Macaroni Cheese 4

I was never a fan of Macaroni Cheese growing up – too often it to me tasted of well Macaroni & Cheese! A bit bland and not something I would seek out. Well this has all changed with a few additions and jazzing up my basic recipe. The secret to mine is adding sautéed garlic, mushroom & bacon and the flavour is just lovely.

Ingredients

400g Macaroni Elbows (can use any pasta – this day I needed to top up with spirals!)

8 bacon rashers sliced
10 – 15 button mushrooms sliced
1 heaped tsp crushed garlic
2 tsp butter

50 g Butter
2 Heaped Desert Spoons Flour
2 cups of Full Milk
Salt & Pepper to Taste
2-3 Cups Tasty Cheese – or whatever hard cheese you prefer

Method

Cook Macaroni in boiling water according to packet instructions until al dente – different brands will cook to slightly different times. Once the macaroni is cooked drain and set aside.

Macaroni Cheese 2

Meanwhile melt butter in a small saucepan over a gentle heat and once melted add the flour – this will form a paste, cook for a few minutes until the paste begins to slightly foam & change consistency – do not allow to brown. If it looks too dry a little more butter or too wet a little more flour – you will eventually know the amounts with your eyes closed!

Using a whisk slowly add the milk to your flour & butter paste, I add half a cup at a time and whisk well in between – this ensures no lumps in your sauce.

Once all the milk is added simmer on a low heat until your sauce starts to thicken, stir often to ensure it does not stick on the bottom of the pan. Once your sauce is the consistency you desire – nice and thick so it coats the back of the spoon and falls in long slow ribbons, add salt & pepper to taste and set aside.

Macaroni Cheese 3

While the sauce is thickening pop 1 tsp butter in a frying pan and brown off the diced bacon, once this is crispy I add my mushrooms, the remaining butter & the heaped tsp of crushed (or fresh) garlic. Sauté until the mushrooms are cooked through.

In a large casserole bowl or dish add the drained pasta and the bacon mushroom mixture together & set aside.

Add all but 1/2 a cup of the cheese to your white sauce – the more cheese you add the more ‘cheesy’ and gooey your Macaroni will be!

Pour the cheese sauce over the Macaroni/Bacon and mix in well.

Sprinkle over the remaining cheese in top and back for 15-20 minutes in a moderate oven until the top is a lovely golden brown.

Yum! Cheesy, gooey, bacony, garlicy, mushroomy goodness! Perfect comfort food!

I hope you enjoy this recipe as much as we have.

Macaroni Cheese 5

Like me on Facebook to get updates on our new posts – http://www.facebook.com/justamumnz

Summer Pasta Salad

summer Pasta Salad 6

This is my go to dish for summer BBQ’s & pot luck dinners and is always popular – can be made with or without any added meat and really can have any additions of yummy in season vegetables you like! Almonds are of course optional in case of allergies – but add a lovely crunch and texture to the dish – can always serve on the side if unsure.

Ingredients

San Remo Vegeroni Shells
1 each – Red, Orange, Yellow Capsicums
1/2 cup dried cranberries
1/2 cup diced roasted almonds
1 cup sliced cherry tomatoes
3/4 cup Best Foods Mayo
3 TBSP Honey Mustard Dressing
(Optional) Bacon or Ham or Cooked chicken diced or shredded

Summer Pasta Salad 2

Method

Cook Pasta shells until al dente according to packet directions – any pasta can be used, but this adds to the colour of the dish. Drain well and I rinse with cold water to ensure pasta cold ready to add ingredients to.

Summer Pasta Salad 1

Dice capsicums into small pieces, slice cherry tomatoes in half, slice almonds into small pieces – I love to prepare this all on one board – the colours are so good for the soul! Add your cranberries to the mix.

Summer Pasta salad 3

Today I used grilled bacon and sliced this into small pieces, its also a great recipe for left over ham or chicken – just dice into small pieces and add what you have to taste.

Combine your pasta, vegetables, meat etc into a large bowl.

Summer Pasta Salad 4

In a separate small bowl mix the mayo and honey mustard together and combine well – add to the pasta and gently stir to ensure pasta well covered in mayo/mustard mix.

Summer Pasta Salad 5

Cover & Chill until ready to serve.

I have also made this with basil pesto instead of honey mustard and its just as yum.

Enjoy 🙂

Please like me on Facebook to keep up to date with new recipes & other things!

http://www.facebook.com/justamumnz

Let me know how you get on with this recipe and post a pic to Facebook if you try it! 😀

Butter Chicken Pizza

butter chicken pizza 2

I am quite certain this pizza is neither Indian nor Italian and potentially an insult to both food cultures!!! But oh boy we love it – it is a lovely indulgent treat and you can add or omit anything else you think would make it even better.

It also is quite a lazy dish, so that is good at the end of the day – in our house this is a “grown up” pizza the kids are not so keen so they have their Hawaiian. This recipe is for two large pizzas, halve the quantities if only making one – however I use a whole can of curry sauce for this recipe so store the remainder of the can if only making one – alternatively wrap second uncooked pizza well in plastic wrap and freeze.

Ingredients

2 Large Chicken Breasts, diced or sliced
2 Romano’s Extra Thin & Crispy Pizza Bases
1 can Creamy Butter Chicken Curry Sauce
8-10 Button Mushrooms
Philadelphia Cream Cheese
Cashews
Grated Tasty Cheese
Dried Mixed Herbs

I haven’t put all the quantities above as it is up to your taste – I make it up as I go along – you might like more or less cheese, more or less cashews – a sprinkle or a dash is the quantities used 😉

butter chicken pizza 6

Method

In a frying pan brown the diced chicken pieces in a little oil or cooking spray. While this is cooking, spread some of the Curry Sauce over the pizza bases.

butter chicken pizza 3

Clean & slice the button mushrooms and cover entire pizza bases.

butter chicken pizza 4

Once the chicken is almost cooked through add the remainder of the curry sauce to the chicken and leave to simmer until sauce reduced down.

butter chicken pizza 5

Spread the curry chicken over the pizza, add small amounts of cream cheese blobs over pizza, sprinkle cashew nuts as per your taste and top with grated cheese & a dash of mixed herbs.

butter chicken pizza 7

Bake at 220C for 13-15 minutes.

Serve with a lovely fresh garden salad (ha ha had to put that bit to qualify the amount of calories in this recipe!) and Enjoy! 🙂

PS – Can easily use any other curry sauce base you like! Satay is yum too…

Thanks for taking the time to read my recipe – lots of baking ideas too over here >>> so happy searching xo