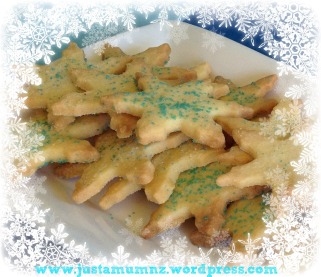
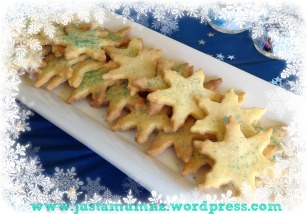
I’ve Moved – Find me at http://justamumnz.com

http://justamumnz.com

I have finally made the jump to a new self hosted website!!! I am a combination of excited, nervous, packing myself and delighted!!

It has been a massive learning curve and not much sleep for 72 hours but it looks like it is going smoothly so far!!

So please all my loyal readers and subscribers head over to http://justamumnz.com and check out the new site, ooh and ahh and I would love your comments either on a blog post or my FB page http://www.facebook.com/justamumnz

Bring on the Next Stage in my blogging journey!

How to Make Your Own Pinecone Bird Feeder

birdfeeder 11

Every now and then I remember to do something crafty with the kids, just to feel virtuous once every few months and not too neglectful lol! This one is easy to do and good for nature too ๐Ÿ™‚ I remember seeing this years ago on a children’s TV show – you need very few ingredients and the kids love it – good messy fun and caring for animals.

Birdfeeder 10

If you are allergic to peanuts this is not the activity for you as peanut butter is the main ingredient however you can use lard), or if you are adverse to mess or gooey sticky hands again steer clear from this one! ๐Ÿ˜‰

What you will need:

Pinecones
Peanut Butter (or lard)
Wild Bird Seed (I got this from Bin Inn $3 for a big bag)
String
Plates, Scissors, Spoon

Birdfeeder 1

Method

Chose a pinecone that has good openings in the body so you can smoosh lots of peanut butter amongst the gaps.

Tie a string securely around the stem of the pinecone – or if no stem – around the top openings.

Birdfeeder 2

Spread 1/2 to 1 cup of peanut butter onto a plate and half a cup to a cup of birdseed onto another plate, depending on how many you are making.

Birdfeeder 3

Roll the pinecone in the peanut butter, using your hands to smoosh the peanut butter in the openings.

birdfeeder 4

Transfer the pinecone to the birdseed and roll around until completely covered in birdseed.

Birdfeeder 5

Then ask the kids to put their hands in the air, touch nothing and make their way to the bathroom for a full de-peanutbuttering of their hands! ๐Ÿ˜‰

Birdfeeder 6

Find a suitable tree and securely tie the pinecone to the tree – choose somewhere the birds often like to come and ensure that you keep any cats away if you want the birds to survive their dinner!

Birdfeeder 7

Then sit back and watch! Depending on the season it may take some time for the birds to come but this is a lovely treat for them during Autumn and Winter.

Birdfeeder 10

Thanks for checking out this easy kids activity, let me know if you try it and see if you can get aย photo of a bird having a snack – we will keep an eye out on ours for the next few days too.

Bird on the Birdfeeder!

Finally got a picture of a wee bird enjoying the pinecone – not clear but you get the idea! ๐Ÿ™‚

birdfeeder 13

You can follow me on Facebook or Twitter or follow this blog by registering your email above left.

Hug your kids today.

Anna ๐Ÿ™‚

Top mommy blog<<<<See this picture above left – please click on it to register your vote for me – its as simple as that ๐Ÿ™‚

Delicious Lemon Brownies

Lemon Brownies 7

I love getting a bag of lemons given to me, our wee tree is getting there but only have 3 lemons from it so far! The next decision is what to make with them. A few months ago Pinterest was full of Lemon Brownie recipes, I was intriguedย – I am a little slow on the uptake but I finally made them today and they are delicious! Lovely lemony smell filling the house and a lovely fresh alternative to our decadent chocolate brownie you will find elsewhere on my blog.

Lemon Brownies 6

In all I used 5 small lemons, you may need less – using both the zest and the juice – this recipe includes a lovely drizzly lemon glaze which adds to the taste and texture of the Yellowie (totally think it should be a word – if its not already I’ll claim it!) Different varieties of lemons have a different taste to both the zest and juice – Meyer lemons are often the most popular as they are not as tart, but any lemons will do.


Ingredients

3/4 cup Sugar
115g Butter
3/4 cup Plain Flour
1/4 tsp Salt
2 large eggs
2 Tbsp Lemon Zest
2 Tbsp Lemon Juice

Lemon Glaze

1 heaped cup Icing Sugar
4 tsp lemon zest
1/3 cup Lemon Juice (adding a little at a time)

Lemon Brownie 1

Method

Pre Heat oven to 170C.

Prepare a 25 x 25 cm baking tin or slice pan with baking paper or grease well and set aside.

Prepare your zest (using smallest side of grater) and lemon juice and set aside.

Using an electric mixer cream the butter and sugar until pale and creamy (approx 2-3 minutes), add flour and salt and combine well.

In a separate bowl whisk together the eggs, lemon juice and lemon zest. Pour this into the flour mixture and beat at a medium speed until smooth and creamy – up to 2 minutes more.

Pour into the prepared baking pan and bake for 20-25 minutes (check at 20). The brownies edges should only just begin to go golden and a skewer in the centre will come out clean. Ensure you do not overbake it or it will be dry ๐Ÿ™‚

Lemon Brownie 2

Prepare Lemon Icing Glaze once the sliceย has cooled completely.

In a small bowl add the icing sugar (sifted if required) lemon zest and slowly add the lemon juice until you get the desired consistency – should be able to pour easily but not too runny. You can do this glaze in two layers if you would like a thicker layer – simply allow a few minutes to set in between pouring next half of mixture.

Lemon Brownies 3

Cut into small squares and serve. Store in an airtight container.

Lemon Brownie 10

Thanks for stopping by to check out this recipe – look up the top of the page for my Sweet Treats Tab for more delicious recipes and lots of fun kids activities too.

Lemon Brownie 5

You can follow me on Facebook or Twitter, or register your email address above left to receive posts as I publish them.

Lemon Brownies 8

Have a wonderful day – Happy Baking – I would love to hear your comments or let me know when you make it and how it turned out ๐Ÿ™‚

Anna ๐Ÿ™‚

Top mommy blog<<<<<< See this picture above left?ย Please click on it to register a vote for my blog. Ta ๐Ÿ™‚

Grandma’s Chocolate Squares

Grandmas Chocolate Squares

I was blessed to know my wonderful Grandma into my early 20โ€™s until she passed. She was a busy Wife to a Sheep Farmer, a Mother to seven, a Grandma to 21 and by now would be a Great Grandma to lots & lots of Great Grandchildren!

She was very special to me and some of the fondest memories I have of her are baking and preparing meals for her family & grandchildren and I am delighted to have many of her recipes, passed on by my Mum who was her eldest daughter.

Grandmas Chocolate Slice

My mum has been making this slice for years, it is soย  tasty, a simple slice to prepare and a great one to whip up quickly with basic ingredients.


Ingredients

115g butter
1 Cup Sugar
1 egg
1 Cup Flour
1 tsp Baking Powder
3 tsp Cocoa
1 Cup Coconut
1 Cup Sultanas

Basic Chocolate Icing

1ย  ย 1/2 Cups Icing Sugar
1ย Heaped Tbsp Cocoa
1 tsp Melted Butter
1/2 tsp Vanilla
1-2 Tbsp Hot Water

Method

Preheat Oven to 170C.

Cream butter and sugar together until pale and creamy.

Add egg to butter mixture and beat in well.

Add Flour, Baking Powder, Cocoa, Coconut and Sultanas and mix until well combined.

Pour into a greased or lined slice tin (18 x 27cm) and press down until smooth. The lined tin works best as easy to lift out once cooled.

Bake for 25 minutes.

You need to ice slice while still warm. To prepare the icing combine the icing sugar, cocoa, butter and vanilla in a medium bowl. Add the water a little at a time until you get the desired consistency. Once removedย from ovenย spread the icing over the still warm (but not hot) slice until it is evenly covered, it will meltย onto the sliceย so a little goes further.

You can decorate with a sprinkling of coconut or chocolate hail if desired once iced.

Remove slice from pan once cooled and cut into small squares. Store in an airtight container.

Chocolate Slice


Thanks so much for checking out this lovely family recipe. To keep up to date with my latest recipes you can Like me on Facebook or Twitter or register your email to receive the latest posts from the blog as they are published. Check out above left for the right places to click!

๐Ÿ˜€ Anna

Top mommy blog<<<<<<See this picture above left? I would love it if you could click on it and spread the love ๐Ÿ™‚

Divine White Chocolate Cheesecake with Berry Coulis

Need to find an excuse to make this again, so tasty and super simple – great go to recipe for a special occasion ๐Ÿ™‚

Just A Mum

White Chocolate CheesecakeI discovered this recipe after endless requests from my lovely husband to learn how to make his favourite dessert โ€“ Cheesecake! I have no time for fancy ingredients or tricky techniques so after combining a few ideas from online this is what I have come up with.

It is a White Chocolate Cheesecake using a block of Whittakers White Raspberry Chocolate, but you can easily use your favourite white chocolate and it will still be just as tasty. And the couli? Only two ingredients ๐Ÿ™‚ I said it was easy!

Prepare it at least 4 hours before you wish to eat it โ€“ it will still be fine after a day or two in the fridge so I will not judge if you have cheesecake for breakfastโ€ฆโ€ฆ..

Ingredients

Base
100g butter
1 packet super wine biscuits

Filling
500g cream cheese
1 tsp vanilla
1/2 Cup caster sugar
250g Block Whiteโ€ฆ

View original post 819 more words

Bathtime Fun! Shaving Foam Bath Paint

Been a while since we did this – will do it tonight – the kids love it! ๐Ÿ™‚

Just A Mum

Foam ingredients

Who wouldnโ€™t love to paint the walls while you are having a bath! My kids love this simple yet fun activity โ€“ takes no time for me to whip up and no time at all to clean up either when they are done! Would be great for little ones who are reluctant to have a bath at night, of course use appropriate products if your kids have sensitive skin etc โ€“ but for everyone else โ€“ you MUST try this!

You will need:

  • Shaving Foam (I buy the cheapest I can find โ€“ Homebrand here in NZ)
  • Food Colouring

I mix in bowls or sometimes I use muffin trays to make lots of colours

Simply mix the foam and the various colours together โ€“ you will want to err on the side of less is more so that the colours do not stain, but I have not had this happenโ€ฆ

View original post 181 more words

Orange Chocolate Chip Cookies

Orange Choc Chip Cookies 4

I love the combination of orange and chocolate – it just works so well. These cookies are the perfect combination, lots of chocolate chips, a soft and crunchy cookie with a hint of orangey goodness.

This recipe is really easy to make using the basics from the pantry and one orange – cannot get much easier than that!

Orange choc chip cookies 3

This recipe makes approx. 30 cookies.

Ingredients

170g butter softened
90g soft brown sugar
90g castor sugar
2 medium eggs
320g plain flour
1/2 tsp baking powder
1/2 tsp baking soda
pinch salt
200g Chocolate Chips
Zest of 1 Orange (finely grated)

Orange Choc Chip Cookies

Method

Preheat oven to 180C

Combine the flour, baking powder, baking soda and salt together and set aside.

Cream the butter, brown sugar and castor sugar in a food mixer until pale and creamy.

Add the eggs one at a time on high until well combined.

On a low speed or with a wooden spoon fold the flour into the creamed mixtre. Mix in the chocolate chips and orange zest and gently combine.

Roll tablespoon sized pieces of dough into balls and pop onto greased or lined baking trays leaving an inch or so between to allow to spread.

Using your hand or a fork gently pat the balls flat. Baking for 13-15 minutes until lightly golden.

Remove from the oven and cool for a few minutes before transferring to a wire rack, store in an airtight container.

Orange Choc Chip Cookies 2

These are sooooooo good, of the first batch only about 10 made it to the cookie jar – the smell and taste ensured the visitors ate them warm straight from the oven!

Orange Choc Chip Cookies 4

For more lovely recipes have a look around the site, or follow me on Facebook or Twitter.

Have a great day and thanks for stopping by ๐Ÿ™‚

Top mommy blogSee this picture above left? Please click on it to leave a vote for me and make my day ๐Ÿ˜€

‘Frozen’ Snowflake Cookie Recipe – Yum!

Frozen Snowflake Cookies 2

For our recent Frozen Birthdayย Party I wanted cookies to fit the theme so snowflakes were perfect! A cutter from our local kitchen store was $4.99 and will be well used at Christmas each year also.

It is not easy finding a great cookie recipe to use shape cutters with, some are too crumbly, dry, and a pain to work with but this one works really well, it is a really tasty biscuit on its own at any thickness so could be used as a basic cookie or rolled out and used with any shape cookie cutter, it is lovely and buttery and crisp – like a nice shortbread.

You can have the cookie on its own, or with sugar sprinkled on top, with pretty icing, dipped in chocolate or sandwiched with jam or icing! ๐Ÿ˜€

The recipe is simple but you will need to make it in advance as it needs to be refrigerated for a few hours before it is hard enough to work with. Do not be alarmed when its first made as it is super soft and hard to imagine it will come together to use with a cookie cutter or hold its shape!

Frozen Snowflake Cookies 1

Ingredients

225g Unsalted Butter (I used normal and it was fine)
3/4 Cup White Sugar
1/4 tsp salt
1 1/2 tsp Vanilla
1 Egg
2 Cups Flour

Method

Combine the butter and sugar together in food mixerย until it is pale and creamy, scraping down the sides of the bowl occasionally and then mix the salt and vanilla well into this mixture.

Add the egg and beat well.

Slowly add the flour and mix until only just combined.

Place some plastic wrap or gladwrap on the bench and tip the mixture into this. You can either gently mould it into a flat ball shape if you wish to roll it out later for cookie cutters, or you can manipulate it into a roll in the wrap to later cut into 1 cm slices.

Cover and refrigerate for at least two hours to several hours if you wish to cut slices off it.

Once out of the fridge gently knead the dough and on a well floured surface roll out the dough to the desired thickness, we went quite thin but could also be thicker and just cooked longer. You may need to flour the rolling pin too to ensure nothing sticks.

Use the cookie cutter to cut the shape and gently transfer to a baking tray lined with baking paper. Cook at 160C for 13-15 minutes. Keep an eye on them from about 12 minutes on to ensure that they do not begin to brown at the edges, they should be pale golden underneath when done.

Cool on the tray for 3 minutes then transfer to a wire rack to cool completely. Store in an airtight container for up to 5 days.

For the Frozen Party Snowflake I added blue sugar crystals to the top for the icy effect before I baked them, you could add red or green for Christmas, or even add some food colouring to the recipe to make cookie shapes for whatever theme you need.

These were very popular at the party with kids and adults alike.

Frozen Snowflake Cookies 3

Thanks for stopping by –ย I will be uploading more Frozen Themed Partyย Recipes and Ideas over the coming weeks so search above leftย forย FROZEN.

frozen party 1

You can follow me on Facebook or Twitter, and now Pinterest to stay in touch with my new recipes and fun kids ideas.
http://www.facebook.com/justamumnz
http://www.twitter.com/justamumnz

Top mommy blog<<<< See this picture above left at the top of the page? Click on it to vote for me – thanks!

Anna ๐Ÿ™‚


Grandma’s Recipe – Banana Cake

Baking this weekend and dealing with some less than pretty bananas – and this is top of the list – LOVE this recipe, let me know if you give it a try ๐Ÿ™‚

Just A Mum

Banana Cake 7
I was blessed to know my wonderful Grandma into my early 20โ€™s until she passed from Cancer. She was a Wife to a Sheep Farmer, a Mother to seven, a Grandma to 21 and by now would be a Great Grandma to lots & lots of Great Grandchildren!

She was very special to me and some of the fondest memories I have of her are baking and preparing meals for her family & grandchildren and I am delighted to have many of her recipes, passed on by my Mum who was her eldest daughter.

This is one of the first recipes I made as an adult and continue to make often to this day always with her in my heart. Whenever bananas go past their best I pop them in the freezer โ€“ you can then get the bananas out a few hours before you need them, or you canโ€ฆ

View original post 357 more words

‘Frozen’ Coconut Ice

Frozen Movie Coconut Ice

We went a little Frozen crazy recently for my Daughters 4th birthday party! If you have been living in a cave it is the latest Disney Movie that is a huge hit with kids! Blue & White food was the theme and boy did I have fun Googling, brainstorming and going Pinterest crazy!

This is a modification of my usual coconut ice recipe to make it more Frozen like ๐Ÿ™‚ย This is the uncooked coconut ice, great for kids to make as it is not hot and can be handled straight away. So easy and looks really effective, you could alter the colour to suit any theme or party – red and green for Christmas, white and green for St Patrick’s, pink and pinker for Valentines etc etc.


Ingredients

3 1/2 Cups Icing Sugar
3 Cups Desiccated Coconut
1 tin Condensed Milk (400g)
1 tsp vanilla essence
Blue food colouring

Method

Combine the icing sugar, coconut, condensed milk and vanilla in a bowl and blend well. Once it begins to come together use your hands or a strong wooden spoon to kneed it until completely combined .

Frozen Coconut Ice 1

Take half the mixture into another bowl and add a few drops of blue food colouring until you get the desired colour, work quickly as it does begin to set.

Line a baking tin (I used a 25cm by 25cm tin) with baking paper, and spread the blue mixture evenly into the tray, press down with a damp hand to get it smooth and even.

Carefully dollop the white mixture over the blue and with the back of a spoon or your damp hand cover the blue evenly with mixture, ensuring the two colours do not mix.

Frozen Coconut Ice 2

Once complete pop in the fridge to cool completely and set, this will take around an hour or two. I took it out of the fridge for 20 minutes before I sliced it into small squares, and pop back into the fridge until you are ready to serve.

Frozen Coconut Ice 3

I have lots more Frozen party ideas that I will pop up over the coming weeks, search Frozen in the side bar to see what else we came up with!

frozen party 1

If you like what you see follow my blog on Facebook or Twitter, or sign up your email above left to get the latest posts as I post them. Also check out my Sweet Treats or Kids Activities tab above for lots of great ideas to keep your household busy and happy.

Thanks for stopping by! ๐Ÿ™‚


See this photo top left?? Click on it to add a vote for me via TopMommyBlogs. Please and Thank you ๐Ÿ™‚
Top mommy blog